Many people ask how I got started in baking. I got started baking very young with a small cookbook my mother got me that had EASY RECIPES FOR YOUNGSTERS or something like that. My Mom, always full of encouragement when it came to creative endeavors, hooked me up. I had real metal cookie cutters and measuring spoons and THE FIRST THING I EVER BAKED WAS...................Biscuits. I am, wasand always will be A BISCUIT FANATIC!
Oh the fluffy, warm, melt-in-your mouth moment of biscuit impact is THE BEST! Butter and Raspberry Preserves for me please.
So here is a super basic biscuit recipe and you should find a little person and teach them how to make them because THAT WOULD BE AWESOME!
Heat the oven to 425°F and arrange a rack in the middle. Line a baking sheet with parchment paper; set aside. ALERT ALERT ALERT! 425 in an uncalibrated oven is dangerous!!! You may want to do 400 degrees to be safe.
Whisk
the measured flour, baking powder, salt, and baking soda together in a
large bowl to aerate and combine. Add the butter pieces and toss to just
coat them in the flour mixture. Place the bowl in the freezer for 10
minutes.
Using a pastry blender or 2 knives, and
working quickly so as not to soften the butter, cut the butter into the
dry ingredients until it’s in pea-size pieces. Drizzle in the buttermilk
and stir just until a moist, shaggy dough comes together.
Generously
dust a work surface with flour. Scrape the dough out onto the surface
and dust the top with more flour. Using floured hands, gently pat the
dough into a 1-inch-thick circle.
Using a 2-1/2-inch
round cutter dipped in flour, cut out as many biscuits as possible
(press straight down through the dough—do not twist the cutter, or the
biscuits will not rise properly). Transfer the biscuits to the prepared
baking sheet, spacing them at least 1 inch apart. Gather the scraps into
a ball, pat it into a 1-inch-thick circle, and cut out more biscuits.
Repeat as needed until you have 8 total. Discard any remaining dough.
Bake
until the biscuits have risen and are golden brown on top, about 15 to
16 minutes. Transfer to a wire rack to cool slightly before serving.
Foreign Affairs Wine Bar and Bistro in Manchester - by- the-Sea offers a simple menu.
This is their Chopped Salad. A daily chef's choice of fresh ingredients. This one had beets, shallots, blueberries and herbed goat cheese. It was absolutely lovely.
Have you ever had Panna Cotta? Do you know what Panna Cotta is? Hold on please, I am going to copy the definition of PANNA COTTA and then we will discuss it: Panna cotta (from Italiancooked cream) is an Italian dessert made by simmering together cream, milk and sugar, mixing this with gelatin, and letting it cool until set. It is generally from the Northern Italian region of Piedmont, although it is eaten all over Italy, where it is served with wild berries, caramel, chocolate sauce or fruit coulis.
It is not known exactly how or when this dessert came to be, but some
theories suggest that cream, for which mountainous Northern Italy is
famous, was historically eaten plain or sweetened with fruit or hazelnuts.
Earlier recipes for the dish did not directly mention gelatin, but
instead included a step in which fish bones were boiled; this is now
known to extract collagen
from the bones, which turns to gelatin. Sugar, later a main ingredient,
would not have been widely available as it was an expensive imported
commodity. After years this treat evolved into what is now a gelatin dessert, flavored with vanilla and topped with fruit or spices, and served chilled. There are a million different Panna Cotta recipes out there. You can make Chocolate Panna Cotta. You can make Lemon Panna Cotta. You can make Triple Berry Chocolate Lemon Panna Cotta. The only constant elements in Panna Cotta are Cream, Milk, Gelatin and Sugar. It has a very light and velvety texture. The reason I love it so much is because it is very simple and it is SERVED CHILLED! It requires very little cooking time and can be served with a variety of toppings: Fresh Fruit. Crumbled Cookies. Fresh Whipped Cream. Caramel. Chocolate Shavings. YOU PICK! The flavor combinations are ENDLESS! This dessert looks like it would be very complicated and IT IS SO EASY! YAY! I recently saw a recipe for Strawberry Panna Cotta and Strawberry Panna Cotta is my MOST FAVORITE. So, I thought I would share MY RECIPE for Strawberry Panna Cotta with YOU! Here is the recipe for MY STRAWBERRY PANNA COTTA:
2 1/2 cupsStrawberries - chopped 2cupsButtermilk 1 cup of Sugar
2 1/2teaspoonsunflavored gelatin One tablespoon Orange Liquor One Lemon - Zested 1/2 cup Fresh Basil - chopped (If Basil in your dessert sounds weird, skip it. BUT YOU ARE MISSING OUT!) 1/4cupWhole Milk 1/4cupHeavy Cream
You will need 8 - 4 ozSouffleDishesand they should be chillin' in the fridge while you make this!
-Mix the Strawberries, Buttermilk, Lemon Zest and Basil in a blender until pureed.
-Dissolve the Gelatin in the cold Milk for a couple minutes.
-Warm the Cream and Sugar in a sauce-pan until the cream starts to simmer.
REMOVE FROM HEAT!
-Add the Orange Liquor
-Add the Milk and Gelatin and stir until fully combined with a spoon (A whisk will incorporate too many bubbles)
-Add the Strawberry mixture
-Remove the Souffles from the fridge and pour the mixture into each one evenly (this ensures that they set at the same time)
-Chill for at least 4 hours and serve with fresh fruit andwhipped cream and top with chunks of crumbled vanilla cookie.
YUMMMMMMMMMMMMMMMMMMM!
If you have other favorite flavors that you want to mix and match, please comment below and I can can suggest recipes for you!
Here is a Chocolate Mint Panna Cotta!
This is an Egg Nog Panna Cotta with Fresh Black Berries.
Add Orange Zest to your Panna Cotta for an AMAZING Citrus Burst!
Is there anyone on this planet that DOES NOTlike an Omelette? Ok. Most likely there are a few people who don't like this breakfast sensation but they are weirdos.
FRESH EGGS and A HOT PAN!
The two mandatory items required for this little field trip to heaven. Ok. I'm going to jump right in here: Omelettes have a bit of a stigma for being impossibly difficult. People spend millions of dollars every year to pay SOMEONE ELSE to make them Omelettes. It is time to take control of your OWN OMELETTE! Stand up and let's get crackin' (ba dum bum). I call Omelettes, Junkyard Dogs. I mainly say this in my mind so I don't gross out someone who doesn't appreciate the mental picture. BUT THEY ARE JUNKYARD DOGS! You can put anything in an Omelette. ANYTHING. Open your fridge and look at your left-overs: Baked Salmon and Asparagus from last night's dinner? -Throw in some goat cheese and fresh herbs.
Mashed Potatoes and Ribeye Steak, left over from The Rudder (sooooo yummy)? -Slice the steak into strips and sprinkle cheddar all over the potatoes and chuck it into an Omelette.
Get creative.
This is my version of a five-egg JYD (Junkyard Dog - between friends):
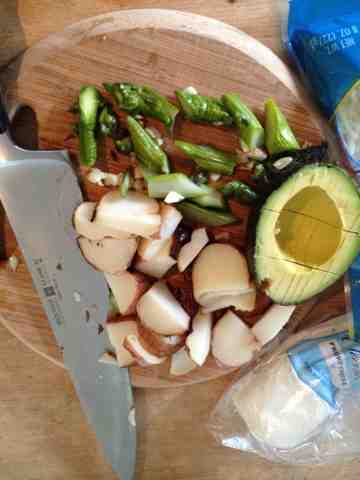
5 Large, Brown Free-Range Eggs A Splash of Whole Milk - two tablespoons, I guess Salt and Pepper Red pepper flakes Two tablespoons of Butter Large Non-Stick Pan Two Red Bliss Potatoes I had baked for dinner last night-sliced them into bite size chunks Three large Asparagus spears covered in garlic from the same meal - chopped up Half a Ripe Avocado - chopped but not mashed, not that it really matters Shredded Monterey Jack Cheese - 1/4 of a cup Goat Cheese - 1/4 of a cup,crumbled
Heat the butter in the pan on medium heat until butter is fully melted. Beat eggs with salt, pepper, milk and pepper flakes in a bowl with a dinner fork until all is combined and it gets a little FROTHY (great word). Turn heat of pan up to med/high and add eggs. Let the eggs cook at med/high for about a minute, pop any bubbles that form with the fork. Turn heat down to medium and start to tilt the pan slightly back and forth so the future Omelette starts to slide back and forth over the surface of the pan. Let it sit for another minute over the heat.
NOW FOR THE CRAZY PART! FLIPPING YOUR OMELETTE....... EEEEEEEEEEEeeeeeeeeek.
Don't get nervous! We will do it together.
With a large rubber spatula or any spatula, start to nudge around the corners of the Omelette while rocking the pan lightly back and forth so that your big yellow sphere is sliding easily around the pan. It is a swirling motion really. The eggs on top will be raw and you want to let the raw eggs run from the center toward the edges to cook. Once the raw egg in the middle of the Omelette no longer runs in a river when you tilt the pan ...... You are going to ATTEMPT THE FLIP......... Tilt the pan to the side and let the Omelette start to slide to the Edge of The Pan. As you tilt the pan back in the other direction and the Omelette starts to slide away from the edgeSLIDE THE SPATULA UNDERNEATH AND JUST GO FOR IT.
If it folds over a bit just flatten it out. Now you should be looking at a plain round of cooked egg.
Take it off the burner. Eggs burn fast and you don't want to over-cook your Omelette while adding your toppings.
Sprinkle with Monterey Jack cheese all over the round. Then top with a strip down the center of the circle with your other toppings.
THIS IS EXHILARATING!
Put the pan back on medium heat and let it sit for just a moment to let the Jack Cheese start to melt then fold one side over the middle and the other side over that (ALLA BURRITO STYLE).
I slice mine in thirds and serve with toasted and buttered pita bread but you can do WHATEVER YOU WANT!!
YAY, YOU MADE AN OMELETTE!! THAT IS VERY IMPRESSIVE!
A fellow blogger friend and I met for a lunch meeting at Lat 43 in Gloucester,MA. We sat at the bar, on the restaurant side. We had a perfect experience.
A knowledgable but not overly aggressive bartender, a good Chardonnay and great sushi.
Their Tuna Tar Tar is one of my favorites though I also love it at The Franklin but this was lunch.
It's always a gamble to eat out but this was a winning combination.
Hi! This is going to be a little tale of how I make my Soup. My best friend in the whole wide world. Yes, Soup is my best friend in the whole wide world. Not one kind of Soup. Soup, as a total concept, is My Bestie. OF COURSE I WILL EXPLAIN! Soup listens to my troubles. Comforts all my sorrows. Soup is whatever I want or need it to be. Something about the process of making Soup is soothing to me. You get to hack up a bunch of veggies, which is a proven therapeutic method for soothing the mind (just watch your fingers). There are days when I will get a specific craving for a specific Soup when I am in a specific mood. Sometimes I just want to use up veggies and sometimes I get inspired by a recipe. It is not always emotionally-based Soup. Sometimes it is inspiration-based. It can be a short-rib stew when I feel cold and tired and weak. It can be a powerful Veggie Soup with ginger when I want to boost my health. I am a hard core Chicken Noodle fan. Oh I LOVE SOUP SO MUCH! If it had a face I would kiss it. Of course doing something creative to express yourself is a great way to process your thoughts. Then add to this the art of Cookingwhich is expressive and great for all the senses. Working with your hands to create something THAT YOU CAN EAT! WHAT!!!!!!? Brilliant. Are you understanding why I have chosen Soup as my best friend? Of COURSE YOU ARE! I have a trillion Soup recipes and we don't have all day, so I will give you some of the basics that I cover and you can add your own voice to the recipe when you make it for yourself. SOUP IS SO EASY to make. One more reason to LOVE SOUP! #1) Make sure you have a nice thick bottom pot. Thin bottom pots allow things to burn easily on to the bottom and that is lame. I got a Creuset for my wedding and it has become my ONLY Soup pot. #2) On medium heat warm 1/4 cup of olive oil and some garlic (I like a lot of garlic but you can use a little or none)(IF you don't like garlic at all, cut up a small yellow onion and use that, K)
#3) STIR When garlic starts to brown TAKE THE WHOLE POT OFF THE BURNER AND SET ASIDE for a moment.
Now it's time for the FUN!
You get to do whatever you want.
I always add a flavor base. A few bunches of fresh herbs (my favorite is thyme and sage), 3 or 4 tablespoons of chopped fresh ginger, salt and pepper and any dried herbs and spices you love. MIX AND MATCH!
Cinnamon and Cloves are yummy. Cumin and Smoked Paprika are great together. Just add about a tablespoon of each so you don't over power the soup. Then you put the pot back on medium heat and add another 1/4 cup of olive oil and mix it together until you can smell the herbs opening up. This only takes a few minutes.
NOW YOU ADD THE SOUP TO THE SOUP!
Chopped veggies? Chopped Chicken? Rinsed, Canned Beans (rinse them well so they don't hold the canned flavor)? Canned tomatoes?
Fresh Tomatoes?
For this one lets use:
10 cloves of Garlic - smashed
Two bunches of Thyme
One teaspoon of Cumin
One teaspoon of Smoked Paprika
Salt and Pepper
Two tablespoons of Fennel Seeds
A head of Kale - Chopped
One small bunch of Carrots - peeled and chopped
One knob ( I invented this term for ginger) of Fresh Ginger - peeled and chopped
Two small Yellow Onions - chopped
One large can of Cannellini Beans - rinsed well
One can of Hunt's Fire Roasted Tomatoes - drained and rinsed OR five or six fresh ones - chopped, seeds removed.
One can of Artichoke hearts - drained and rinsed
Now turn the heat up to med/high and mix all the ingredients together completely BUT DON"T SMASH YOUR BEANS!
ADD - The juice of two two lemons and zest of one
Now add one large carton of Organic Chicken Stock and bring to a simmer.
Let simmer for 10 to 15 minutes and then Shut Off the heat and Cover.
The Soup flavors will steep like a cup of tea. It's glorious! Leave it covered on the stove for about a half of an hour and then bring back up to a simmer and serve. Some people think you have to reduce a soup for hours but the problem with that is the veggies break down in the heat and get icky and mushy.
You can change all of these ingredients. You will be making YOUR OWN BEST FRIEND! Use whatever you love. Don't like the chicken stock because you want it to be a full Veggie Soup! - Use Veggie stock or springwater. Though spring water will not add any additional flavor so you may want to add a little more salt and pepper.
The thing about your Soup is it is alive. DON"T LAUGH! It will get better and better over the next couple days. The flavors will bloom and change. Just store it in the same pot in the fridge and spoon out what you want to reheat.
Top your new best friend with a little grated parmesan or drizzle it with Pesto or Pestou (Fun Fact - these are the same thing but one is Italian and one is French).
YAY! BEST FRIENDS FOR EVERRRRRRRRR!
*Unfortunately not really forever. You should freeze or eat your Soup within four days of making it. The quality will start to break down and you will need to create A NEW BEST FRIEND! But that's OK.
This recipe requires that you take a moment and stare at Elvis Presley's face. Only then can you begin to understand the essence of this remarkable pie. This pie, like Elvis, is intense and provocative yet sweet and dreamy. This is a good pie. I believe Mr. Presley would have agreed.
This pie is called MY Peanut Butter Pie or The Peanut Butter Pie. When you make it, you can call it YOUR Peanut Butter Pie. Just make it. It's so darn good. It's really really really good. If Elvis Presley ate this pie he would have curled up his lip and told me I was taking care of business.
For anyone who is not making the connection between Elvis and this pie....it is rumored that Elvis had crazy comfort food addictions. One of which was a deep fried peanut butter and banana sandwich. How they deep fried a peanut butter and banana sandwich-I don't know, but apparently Elvis couldn't get enough of them. This pie, in my mind, would have made him throw the sandwich on the floor and declare "This is nothing like Sugarlady's Peanut Butter Pie and I will not eat it!". Then he would have grinned and said "Thank you, thank you very much!" Maybe you are thinking "How dare she say what Elvis would do!?". Once you make this pie, you can be the judge. You just need a few things that you probably already have around the house.
Let's get started: PEANUT BUTTER PIE A 10 inch tart pan or a pie dish. 2 1/2-3 cups of vanilla cookie crumbs or THE PRINCESS COOKIE crumbs from the last blog 8 tablespoons of melted butter 1/2 cup of peanuts (salted) 1/2 cup of chocolate ganache *recipe to follow 1 lb of cream cheese (room temp) 2 cups of confectioners sugar 1 1/2 cup of peanut butter 1/2 cup of heavy cream An electric mixer or a Kitchenaid mixer with a paddle attachment. *Chocolate Ganache Recipe 1 cup of chocolate chips-semisweet 1/2 cup of sugar 1/2 cup of heavy cream Warm the cream and sugar together in a sauce pan. Once it starts to simmer, remove from heat. Add chocolate chips and mix until smooth. Don't use a whip, it incorporates too many bubbles and the chocolate chips get stuck to it. Use a wooden spoon.
NOW, back to THE PIE! 1) Mix cookie crumbs and melted butter together and pour into tart shell. Pat crumbs evenly on the bottom and up the sides of the pan. 2) In a 350 degree oven, lightly toast crumbs until golden brown around the edge. Appx 10 minutes. This is your pie shell. Cool completely at room temperature. 3) In mixer, with paddle attachment, whip cream cheese and peanut butter until fully combined on medium speed. 4) Turn mixer off and add confectioner's sugar and heavy cream. *If you don't turn the mixer off and add confectioner's sugar, you will be wearing the confectioner's sugar. 5) Slowly whip the ingredients together until combined and then turn mixer up to med/high speed until light and fluffy. (Taste your mixture and if you like it sweeter, keep adding confectioner's sugar until desired sweetness is produced) 6) In the mean time, drizzle the bottom of the pie shell with ganache OR just pour it in because Who Are We Fooling!? 7) Top the ganache with salted peanuts
8) Fill the pieevenly with the fluffy goodness you have just created in the mixer and rap the tart pan lightly on the counter to release any air bubbles caught between the shell and the filling. 9) Chill overnight. You can even freeze this, well covered, then bust it out for a special occasion. *Top this pie with more cookie crumb for added crunch. Chocolate chips or fruit preserves. When I have extra caramel around, I crush that and sprinkle it on top.
NOW FOR THE KICKER!!!!!!! Do you want to get really crazy with this pie!? YES YOU DO! Slice up two slightly under ripe bananas and place them in a frying pan on low/med heat with a cup of sugar and half a stick of butter and heat until the sugar and butter start to bubble. You can cool this mixture and put it on top of the pie OR add it to the shell with the ganache and the peanuts. Let the bananas cool a bit either way.